📱 Configure your Lock Screen
| TYPE | AUDIENCE | PRIORITY | COMPLEXITY | EFFORT | COST | UPDATED |
|---|---|---|---|---|---|---|
| Preparation | 🧑 | ⭐⭐⭐⭐⭐ | ⭐ | 🧑 | 🆓 | 2021-06-12 |
Rationale
The Screen Lock is the first line of defence of protecting against physical access to your smartphone.
Instructions
What you should know
Despite the best security measures, you may still be forced to unlock your Smartphone under coercion. So also take additional measures such as 📱 Android - Hide Apps and 📱 iOS - Hide Apps.
What you should do
1. Use a PIN code to lock your phone
Based on the advice in 🔒 Generate Stong PINs, generate a PIN code for your phone. Keep the PIN code written down on a piece of paper that you store securely, until you've memorized it.
On 🤖 ANDROID:
- search for 'Security' or "Pin" in the settings, till you find the setting for your Screen lock.
- Turn it on and set your PIN.
On 🍏 iOS - the option is called "Passcode":
- On iPhone X and later, or iPad with Face ID, go to Settings > Face ID & Passcode. On earlier iPhone models, go to Touch ID & Passcode. On devices without Touch ID, go to Settings > Passcode.
- Tap "Turn Passcode On".
- Enter your PIN code.
- Enter your PIN code again to confirm it and activate it.
Since your PIN code unlocks your phone, you will want to keep this secret and not share it with anybody.
2. Turn off Biometrics
Opening your phone with your fingerprint or facial recognition is convenient. But in most countries, enabling Touch ID or Face ID gives law enforcement free access to your phone if you’re arrested.
On 🤖 ANDROID:
- Search for 'Fingerprint' in the settings, till you find the Security setting.
- Remove all fingerprints you have added.
On 🍏 iOS - the option is called "Touch ID" or "Face ID":
- Go to Settings> Face ID & Passcode, or Settings> Touch ID & Passcode.
- Enter your PIN code
- Turn off the toggle for iPhone Unlock through Face ID / Touch ID.
3. Turn on Lockdown
Both Android and iPhone have a function to lockdown your phone in cases of emergency. If you opted not to turn off Biometric unlocking, this is the second-best option to lock your phone in cases of emergencies
On 🤖 ANDROID:
- Open Settings > Security & location > Lock screen preferences.
- Toggle on Show lockdown option.
- Then any time you want to activate lockdown, hold down your power button and tap
Enter lockdown.
On 🍏 iOS:
- The easiest way is to hold down the power button and either of the volume buttons. (On iPhones 5S to 7, hit the power button five times.)
- After a few seconds, your phone will vibrate and offer three options: Power off, Medical ID, and Emergency SOS. Whatever you select, even Cancel, your phone will ask for your PIN code to unlock.
4. Set Autolock with a Short Delay
In both 🤖 ANDROID and 🍏 iOS you are given the option to autolock your phone after a delay. Turn this option on, and set the delay to the shortest amount possible that won't disturb your typical usage of your phone, for example 30 Seconds.
5. Disable Notifications on the Lock Screen
The best protection isn't very useful if you broadcast your messages to your lock screen, so it's recommended to turn off lock screen notifications.
On 🤖 ANDROID:
- Open Settings > General.
- Tap Apps & notifications (or Sound & notifications in older versions of Android).
- General tab and Apps & Notifications in Android settings Tap Notifications > Lock screen.
- Tap Hide sensitive notifications only or Hide all notifications.
On 🍏 iOS:
- Open the iPhone Settings app and tap Notifications.
- Tap an app in the list for which you want to change the lock screen visibility.
- In the Alerts section, tap to clear the circle under Lock Screen to disable notifications from showing up on the lock screen. You can select Allow Notifications to disable all notifications for that app, but that also removes Banners and Notification Center pop-ups, which you might still want.
- Repeat the process with every app in the list to either turn on or off its ability to display on the lock screen.
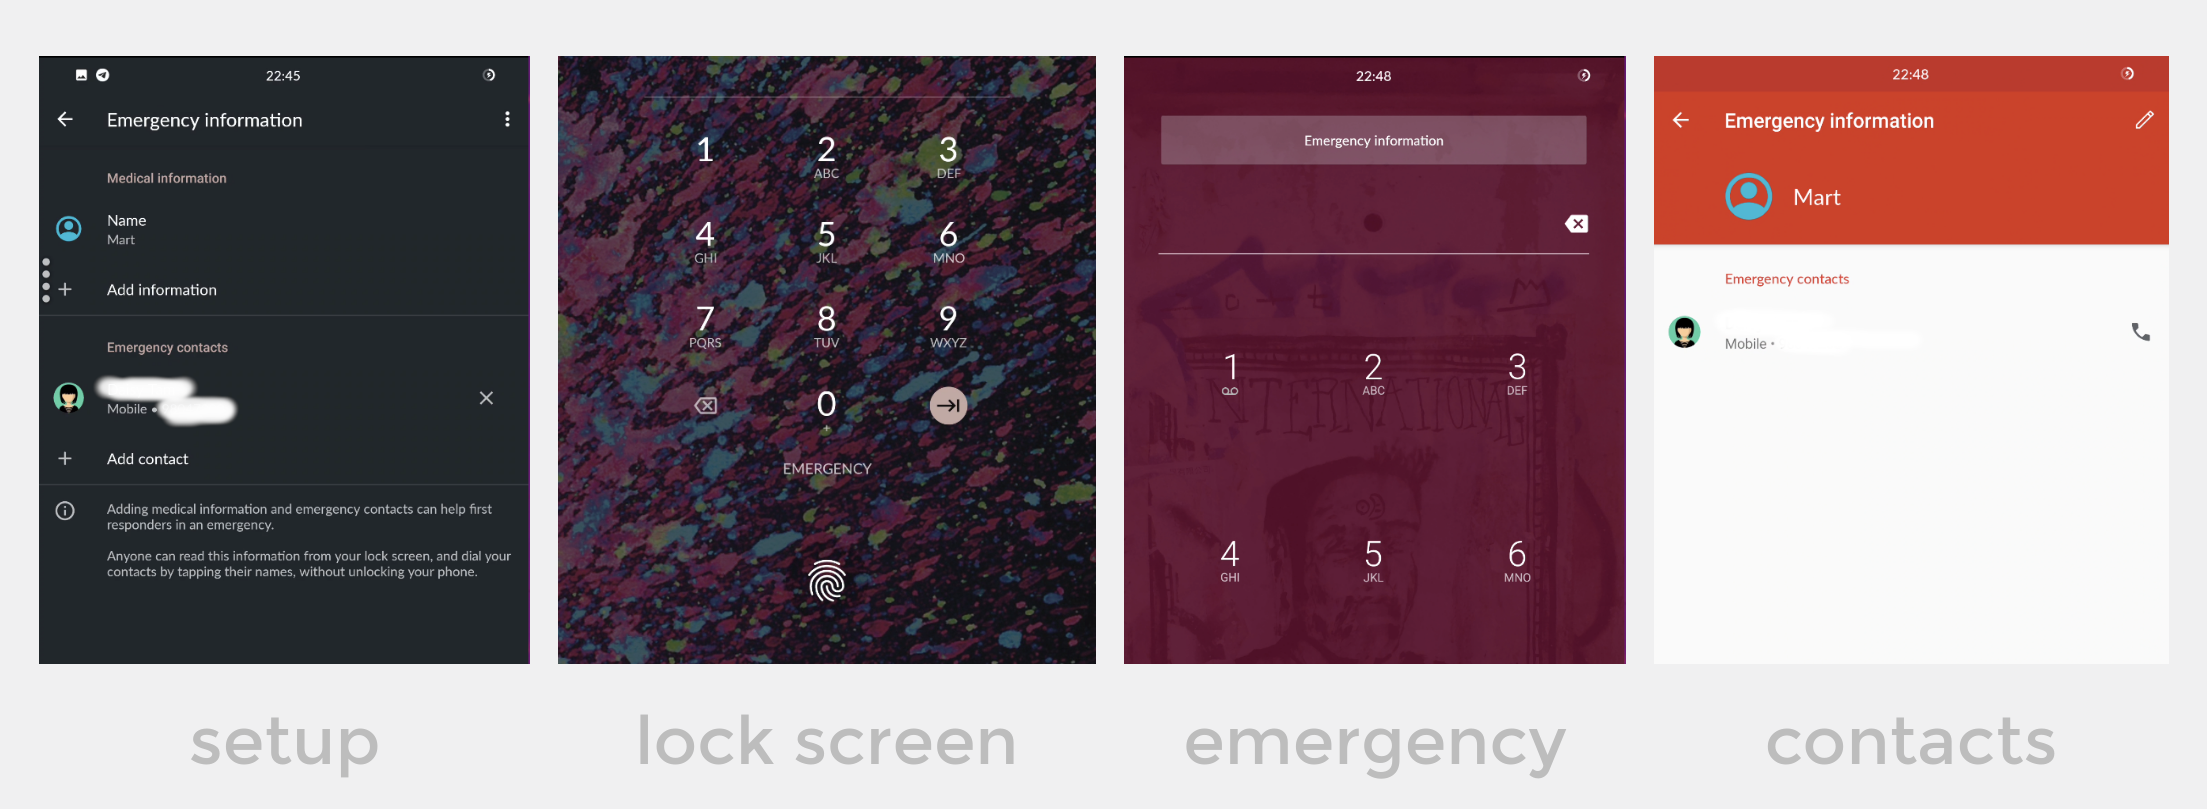
6. Add Emergency Contacts
Whether it is a good idea to have identifying information on your lock screen is situation dependent. For example, if you are going to be in situations where you do not want to be recognized by any means, this is not advisable. However, if you could get into a situation where you are arrested, injured, or are in another type of emergency, having somebody on quick-dial that can be informed of the situation without needing to unlock your phone could be a good idea.
Please consider your own situation before proceeding.
On 🤖 ANDROID:
- Open your phone's Settings app.
- Tap About phone. Emergency information.
- Enter the info that you want to share. For medical info, tap Edit information. If you don't see "Edit information," tap Info. For emergency contacts, tap Add contact. If you don't see "Add contact," tap Contacts.
You now have a "Emergency" button on your lock screen and works as shown below
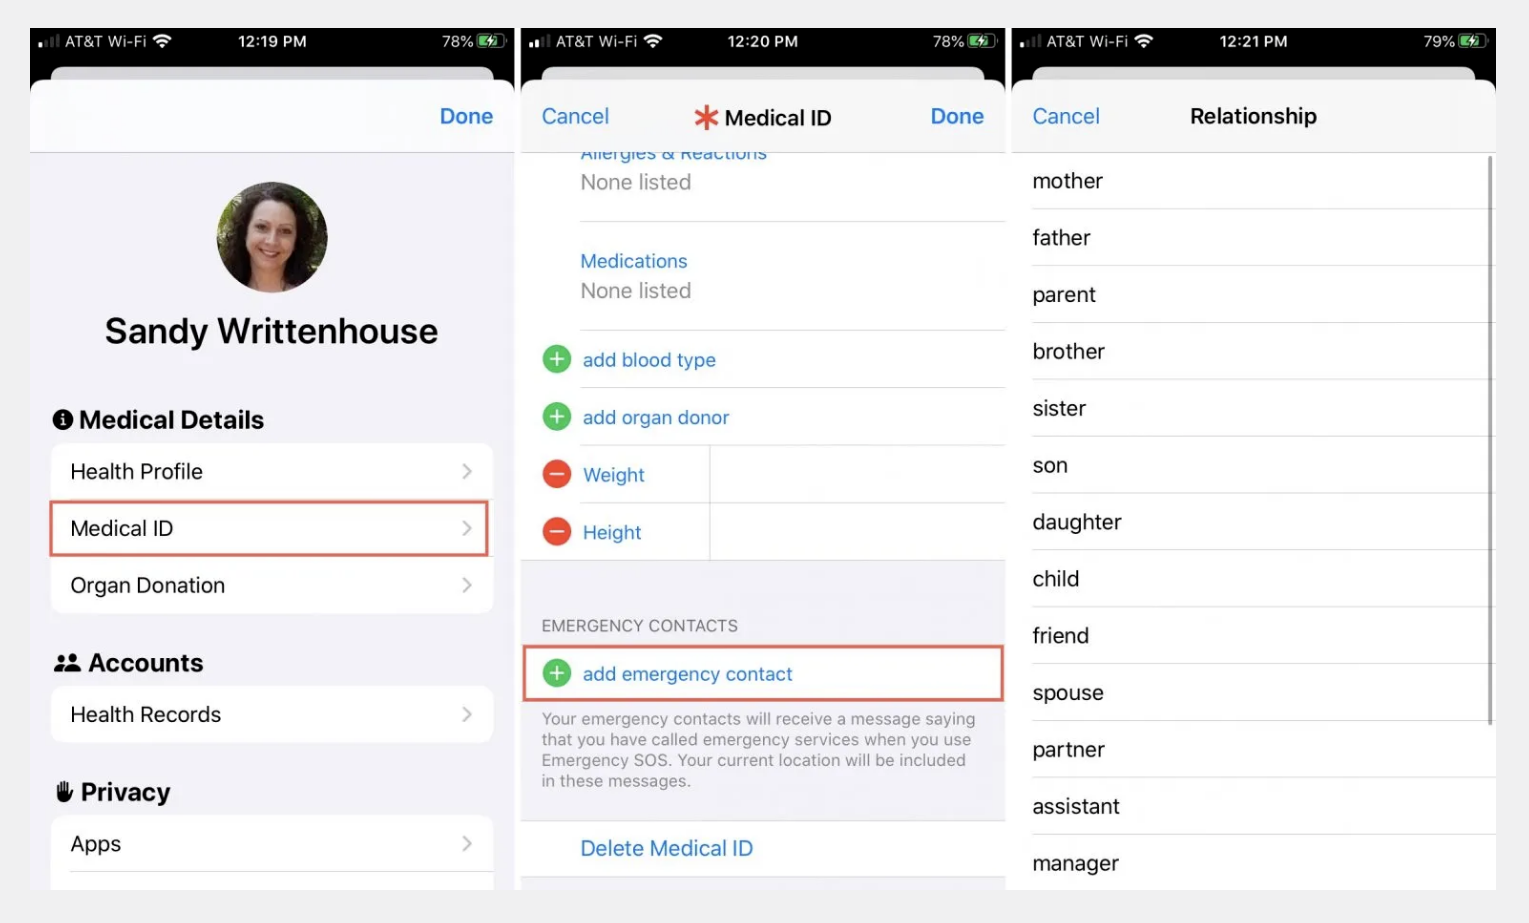
On 🍏 iOS:
- Open the Health app and tap your profile picture
- Tap Medical ID.
- Tap Edit, then scroll to Emergency Contacts.
- Tap the add button to add an emergency contact.
- Tap a contact, then add their relationship.
- Tap Done to save your changes.
This is how you activate it:
- Press and hold the side button and one of the Volume buttons until the Emergency SOS slider appears.
- Drag the Emergency SOS slider to call emergency services. If you continue to hold down the side button and Volume button, instead of dragging the slider, a countdown begins and an alert sounds. If you hold down the buttons until the countdown ends, your iPhone automatically calls emergency services.
- After an emergency call has finished, your iPhone can alert your emergency contacts with a text message, unless you choose to cancel this option. Your iPhone sends them your current location, and, for a period of time when you have entered SOS mode, it sends updates to your emergency contacts when your location changes.
Sources : TechRepublic, Apple, Lifehacker, LifeWire, LifeWire, Apple, Apple